
Deliverr provides fast and affordable fulfillment, helping to boost sales through fast shipping programs like Walmart Free 2-Day Shipping.
Deliverr's multichannel fulfillment can meet your needs wherever you sell, and grow as your business does. With only two all-inclusive fees (fulfillment fee and storage fee) sellers get crystal clear, transparent pricing and insight into their costs and profits from day one. Their easy onboarding and hassle-free experience means you can focus on growing your ecommerce business without worrying about seamless fulfillment.
Before connecting ecomdash to Deliverr, you'll need a Deliverr account. Sign up for Deliverr here, if you have not already done so.
Our integration with Deliverr allows you to send orders from your various sales channels to Deliverr for fulfillment. To get started, you’ll need to connect Deliverr to ecomdash within your ecomdash account, as well as connect ecomdash to Deliverr within your Deliverr account. Find those steps below:
How to Connect Deliverr to Ecomdash
First, you’ll need to add the Deliverr app in ecomdash:
1. Navigate to Settings > Integrations & Tools.

2. Locate the Deliverr app and select App Info.

3. Choose Subscribe to add the Deliverr app to your ecomdash account.
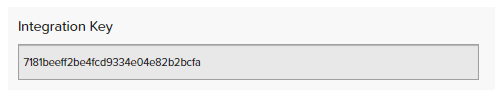
4. Copy your Integration Key. This is the key you’ll need to give Deliverr so they can connect with our API. If a key is not visible, select Generate Key.
How to Connect Ecomdash to Deliverr
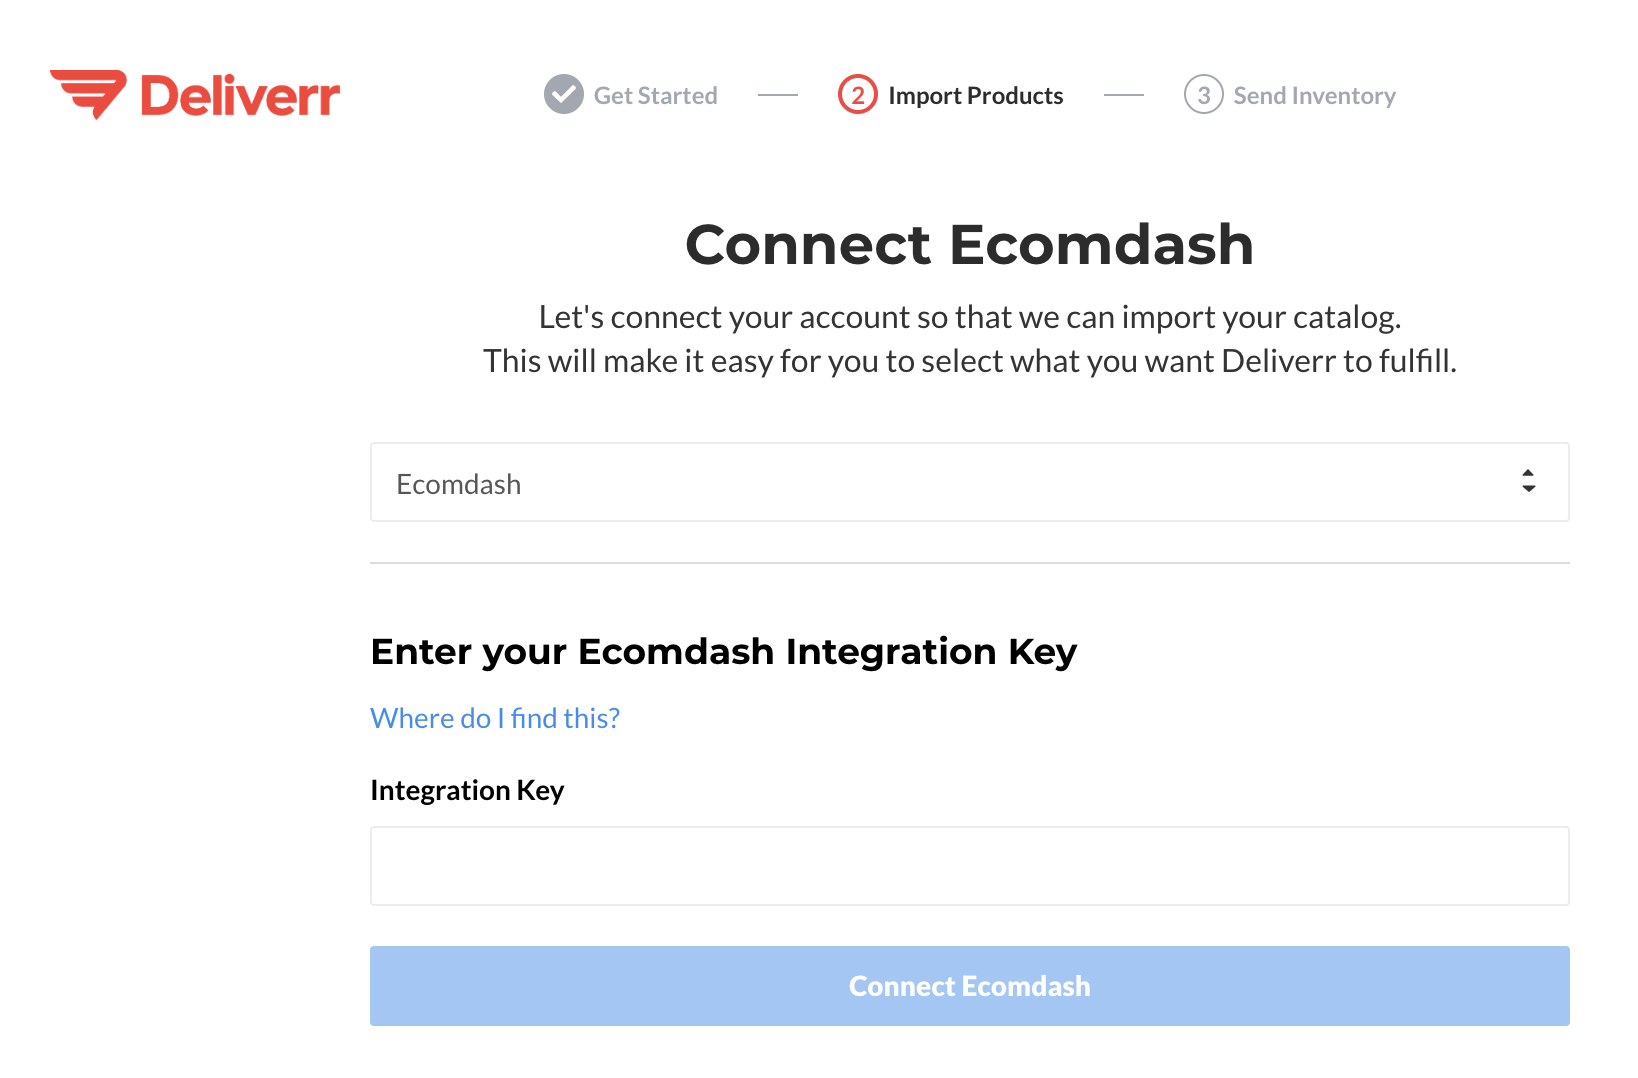
Now that you have your Integration Key, you'll need to navigate to your Deliverr account. Enter your Integration Key in the form at Deliverr and select Connect Ecomdash.
When you’ve connected successfully, a new “Deliverr” warehouse will be created in your ecomdash account automatically. This warehouse will automatically be updated with the product quantities stored with Deliverr.
Now, you’ll need to update the priorities and settings for your Deliverr warehouse. Let’s review how sales orders are processed in ecomdash.
Sales Order Workflow
When an order is processed in ecomdash, it follows a certain path:
- Creation
- Processing
- Post-Fulfillment
Creation
When someone buys a product on an integrated sales channel, our auto import sales orders feature allows ecomdash to automatically receive the order within five minutes. The order is created within ecomdash and is ready for processing.
Processing
Once the sales order has been created in ecomdash:
- We’ll follow any order routing rules you’ve created to route your order to the correct warehouse/fulfillment center (we’ve outlined how these can affect your Deliverr integration below). Please note that the warehouse assignment is determined at the line-item level, which means each item on an order can be assigned to a different warehouse for fulfillment. In other words, we split the order across various warehouses based on the rules you’ve set at the product level.
- After the items on the order have been assigned to the appropriate warehouse(s), we’ll reduce inventory from the specific location(s). If you have auto sync enabled for your products, we’ll also update your sales channels with the new quantity.
- If you have products within a sales order that has been allocated to your Deliverr warehouse, Deliverr will pull that information into their system for fulfillment.
Post-Fulfillment
Once Deliverr fulfills the order, they’ll send up the tracking information. We’ll mark the sales order as complete in ecomdash and push tracking information to your sales channel.
Order Routing
If you have multiple warehouses set up in your ecomdash account, we route orders based on several different rules that you set:
- Storefront Overrides
- Pinned Warehouse
- Warehouse Exclusions
- Geo-Location
- Warehouse Priorities
- Catchall
Storefront Overrides
This option is perfect if you’d like to use your Deliverr warehouse to fulfill all orders from a specific sales channel. For example, if you want Deliverr to fulfill all of your Walmart orders, you would set a storefront override and we’ll route all of your Walmart orders to Deliverr.
Please note, if you receive an order from this specific sales channel for a product that is out of stock, the order will still be allocated to Deliverr. This could cause stock outs. Be sure to enable auto sync for this product to prevent this from happening.
To set a storefront override in ecomdash:
1. Navigate to Settings > Integrations & Tools
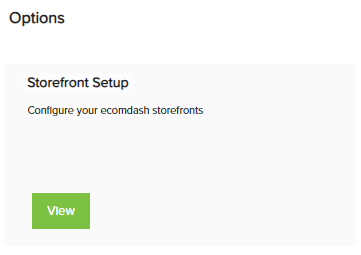
2. In the Options section, choose View on the Storefront Setup title.
3. Select View to open your storefront details.
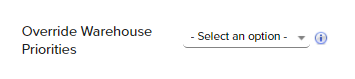
4. From the Override Warehouse Priorities dropdown, choose Deliverr.
5. Save your Storefront Details. All orders from this sales channel will now be routed to Deliverr.
Pinned Warehouse
If you have a product that should only be fulfilled by your Deliverr warehouse, you can set a Pinned Warehouse to ensure any order with this item is allocated to Deliverr only. Please note that the other items within the order can still be split since this override is at the product level only.
Another important disclaimer: If you receive an order while the product is out of stock, the order will still be allocated to your Deliverr warehouse. This again could cause ingestion stock outs. Be sure to enable auto sync for this product to prevent this from happening.
To set a pinned warehouse:
1. Navigate to Products > All Products.

2. Locate your product and select Actions > View.

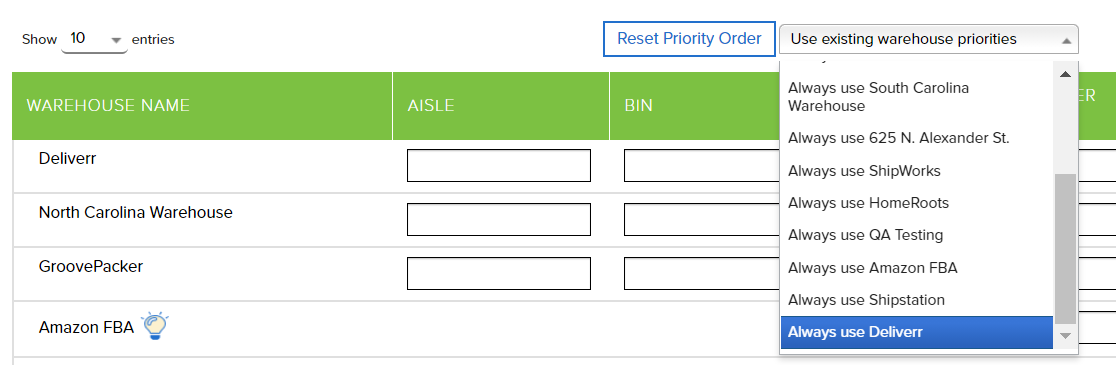
3. In the warehouse table, select the Use existing warehouse priorities dropdown.

4. Choose the Deliverr as the pinned warehouse for this product.
5. From the Actions dropdown, select Save. Now any order with this item will be routed to Deliverr.

Warehouse Exclusions
Warehouses can be excluded from storefronts to ensure no orders are sent to that location for fulfillment. Think of it as the opposite of a storefront override mentioned above. For example, if you’d like to prevent Amazon orders from being picked up by Deliverr, you can exclude Amazon within your Deliverr setup.
To set a warehouse exclusion:
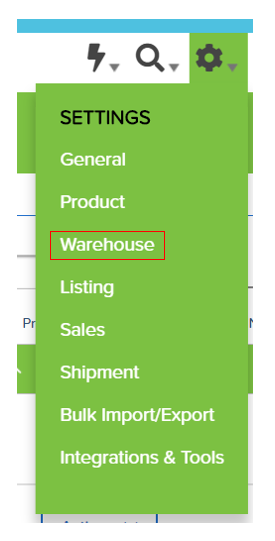
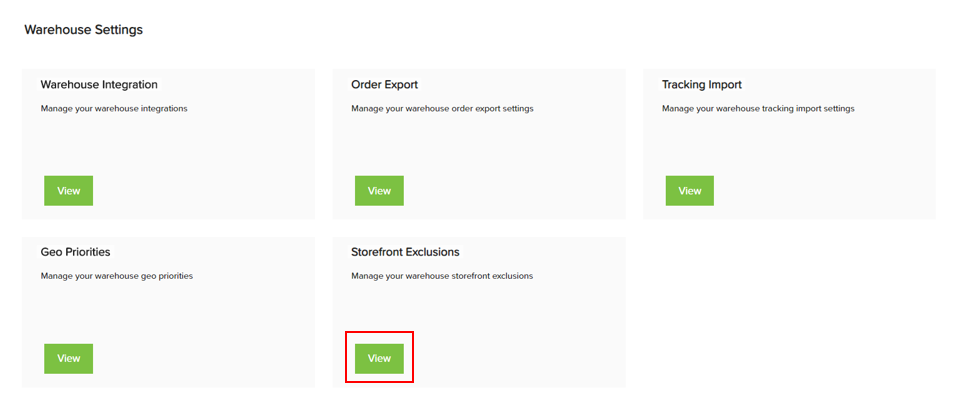
1. Navigate to Settings > Warehouse.
2. Choose View to manage your Dropship/3PL warehouses.

3. Choose View on your Deliverr warehouse to open the warehouse details.
4. In the Warehouse Settings section, select View to open your Storefront Exclusions.
5. Choose the specific storefront you want excluded from Deliverr from the dropdown and select Exclude Storefront.
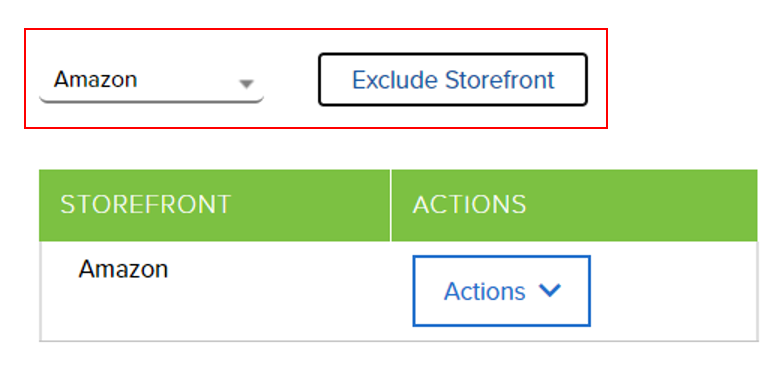
6. Select Back and Save to update your warehouse details. From now on, if you have any orders from this specific sales channel, they will not be routed to Deliverr.
Geo-Location
You can also route orders to a specific warehouse based on a customer’s shipping address.
To set up geo-location:
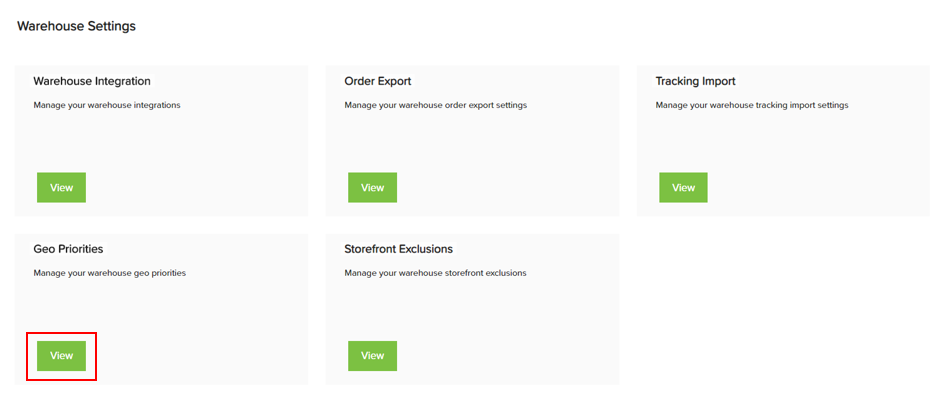
1. Navigate to Settings > Warehouse.
2. Choose View to manage your Dropship/3PL warehouses.
3. Choose View for your Deliverr warehouse to open the details.
4. In the Warehouse Settings section, select View to open your Geo Priorities.
5. Choose a Country and/or State from the dropdown(s) provided and select Add Location(s).
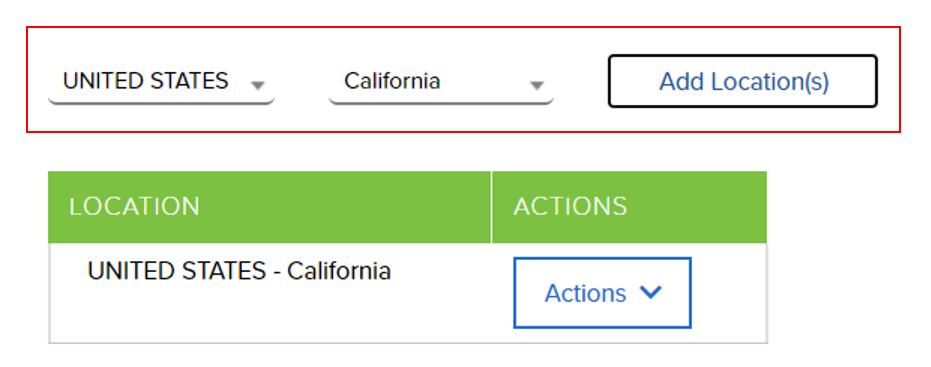
6. Select Back and Save to update your warehouse details. Now, if you have any order for a customer located in this specific area, we’ll route the order to Deliverr.
Warehouse Priorities
If you haven’t set any of the rules outlined above, we’ll allocate your orders based on warehouse priorities. You can rank each warehouse in your ecomdash account by assigning numbers to each, with number one being the highest priority.
When you receive a new sales order, we’ll route the order to the warehouse that is set as priority one. If that warehouse is out of stock for a specific product, we’ll route the order to the next warehouse on your list and so on.
Warehouse priorities can be set at both the account and product level, however product priorities will override any account priorities. For example, if you have Deliverr set as the priority one warehouse for your overall account but you have a different warehouse set as the priority one warehouse for a specific product, the order will be allocated to that warehouse, not Deliverr.
To set warehouse priorities on the account-level:
1. Navigate to Settings > Warehouse.
2. In the Priority Order section, set the priority order for your warehouses with the number one representing the highest priority. You’ll need to ensure that each warehouse has its own unique number.

3. Save your warehouse priorities.
To set warehouse priorities on the product-level:
1. Navigate to Products > All Products.
2. Locate your product and select Actions > View.
3. In the warehouse table, set the warehouse priorities with the number one representing the highest priority warehouse for the product. Again, you’ll need to ensure that each warehouse has its own unique number.

4. Choose Actions > Save.
Catchall
A catchall warehouse is considered a last ditch effort for any orders. An order will only be allocated to the catchall warehouse when a product is out of stock everywhere. We don’t recommend setting Deliverr as your catchall, as it could cause ingestion stock outs.
To set your catchall warehouse:
1. Navigate to Settings > Warehouse.
2. In the Catchall Warehouse column, select the correct warehouse.

3. Save your warehouse priorities.
Split Orders
If you receive an order with multiple products that are stored in different warehouses, you’ll see the warehouse that will be used to fulfill each product from the dropdowns within the Order Details. For example, if the hammock is set to be fulfilled by Deliverr and the first aid kit is set to be fulfilled by Amazon FBA, you’ll see the corresponding warehouses from the dropdowns provided.
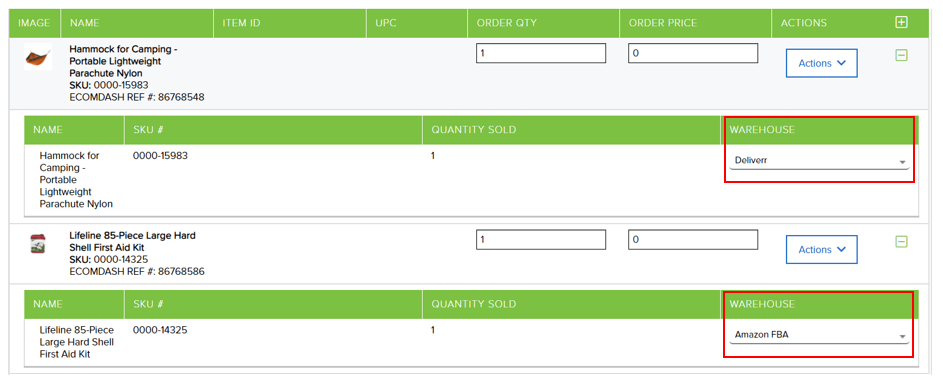
If you receive an order and one product is split between multiple warehouses, ecomdash will route the orders to the correct warehouses based on the rules you have set and you'll see the warehouse used to fulfill the items, as well as the quantity they're fulfilling, from the dropdowns in the Order Details. For example, if you receive an order for 5 hammocks and you only have a quantity of 1 at Deliverr and the rest of the quantity at Amazon FBA, we’ll split the order between those warehouses and you'll see the corresponding warehouses from the dropdowns provided.

Comments
0 comments
Please sign in to leave a comment.